Selling notebooks, journals or other low content books on Amazon can be a great little passive income stream. You really do not need to overthink this, its a numbers game. List a book title, then move on to the next.
I learned how to design and sell notebooks about a year ago and once you learn the process it can be a great little skill that you can then use to publish your own written work on paperback too as I did with my Side Hustles book.
During this blog post you will learn:
- What low/no content books are
- What you will need in order to do this
- The platform you will need an account with in order to sell them on (free)
- How the system works
- A step by step follow along guide on how to create and upload your first book (with free download templates)
I have sold a few of these notebooks so I know this system works, I have also seen many sellers go on to make very nice side income streams this. This is a set and forgot system, once you have your books uploaded to Amazon you can move on to the next design.
Not all your designs will make sales and there is an element of “listing luck” involved in this, but it is a very nice, low-entry way to earn some extra money.
While you are here why not get on the QuickFire Newsletter! No Fluff, No Filler, Just 3 simple things to help you out. Landing in your inbox each week.
What Are Low or No Content Books?
Low content books are books such as diaries, journals, recipe books, etc where you maybe have a few prompts to write things in.
For example, I use a daily journal where I write my three main objectives for the next day and what I got done today.
I talk about that here on this podcast: How To Start a Side Hustle With Just One Hour Per Day
Another example could be a recipe book. Not a recipe book for you to follow, but a recipe book for you to jot down your own recipes.
You get the idea.
No content books are even easier to create.
These are literally blank notebooks or come with lined or dotted pages. That’s it, but people LOVE to buy notebooks. I do, I have many dotted around the house.
Next time you are in a bookshop just check out the shelf with notebooks on and see how many there are. This is a huge market.
Sketchbooks are another great one to sell. Again, minimal content is required. You CANNOT however upload completely blank pages. Amazon will require “some” content on the pages. Lined pages are fine, but if you are doing a sketchbook then make sure at least every third page has something on it.
In the examples I have created for you I have broken the sketchbook down to contain some pages with a border and some storyboard pages. The others are blank.
Your job is to basically come up with a cover design idea, list it, and then hope for some sales.
What You Will Need In Order To Design These Notebooks?
*I sometimes use affiliate links on the blog. If you buy anything from them I may receive a small commission at no extra cost to you. I never recommend anything I do not use personally.
You can use any design software you are happy with. Whether that be Photoshop, Canva, or even Powerpoint to a degree will be fine with this.
I use Canva for all my design work, its very user-friendly but its up to you.
As for the actual content, then any word or doc file will be fine. You can use Google Docs, Word, or again even Canva again.
As we are making blank pages or very low content then it does not really matter.
For my paperback written book Side Hustles, I used Canva as I wanted pages with images, etc too.
As long as you can save the main body of the book as a PDF file it is fine.
I should point out here that dimensions are crucial to this working, but don’t worry I have a few examples below to get you started. You can even download the templates I have made for you to get your first books listed.
If you are making an 8.5″ x 11″ notebook then the pages you create and upload need to be the right size too. More on this later.
What Platform Will I Be Selling My Books On?
The platform we are going to be using is Amazon KDP. You can log in to this using your normal Amazon login details. Providing you have an Amazon account that is if not just sign up. It’s free.
Now, the great thing about this unlike Amazon Merch is there are NO RESTRICTIONS to this and there are also NO LISTING LIMITS.
This is great news for marketers who want to use this as a passive income stream. You see, with Amazon Merch, the print on demand clothing wing of Amazon’s empire you have to wait to be accepted and then when you are accepted you can only list 10 designs to begin with.
With Amazon KDP you will be accepted, and you can list as many of your designs as you like straight from the outset.
How The System Works
If you have read my post on Print On Demand you will know by now how the system works, but if you have not then I will explain it here now.
The system works via “print on demand”, meaning you hold no stock, you do not have ANY upfront fees to pay for the notebooks or even the printing.
This is all taken care of AFTER you make a sale.
Your job is to come up with designs for your notebooks and list them on Amazon KDP.
Leave the rest to them.
Related Post: How To Get Started With Amazon FBA And Send Your First Box In!
Once someone buys one of your books, Amazon will then place the order for it to be printed and shipped to the customer.
You take your cut after the sale has been completed.
It goes like this.
Let’s say you list your book for $7.99 after Amazon takes their printing costs, material costs, and shipping costs you will end up with $2.64.

That is the way it works.
Pretty good hey? Just imagine if you have 100 or even a 1000 notebooks each bringing in just one sale per month each….
That is a nice income stream you have going.
It is not just for people who want to create an income stream though, this method is also great for branding, marketing, and creating lead magnet type offers that can send people to other places such as your website.
Before we continue, would you like to join up with the other 500+ side hustlers who get the best stuff via my newsletter? You can do so really quick by popping your email address in below….. great to have you along!
Step By Step Guide To Designing & Listing Your Own Low Content Book
Let’s really break down exactly how to design and sell notebooks. Well, not just notebooks but any book once you have learned these steps and follow this process.
These next steps I will outline and actually list a book from start to finish to show you how to do it.
Now, obviously I cannot provide the dimensions for every book and you will be required to do a little bit of testing yourself if this is something you want to get into with regards to sizes, etc.
The book I will be showing you how to list is an 8.5″ x 11″ sketchbook. Quite a big book, but great as sketchbook size.
I have bought, sold and made several of this size and they look great.
I will also be using a 100-page template for this.
The idea of this tutorial is to show you how to do it. I have no idea whether this design will sell or not. IT IS JUST AN EXAMPLE.
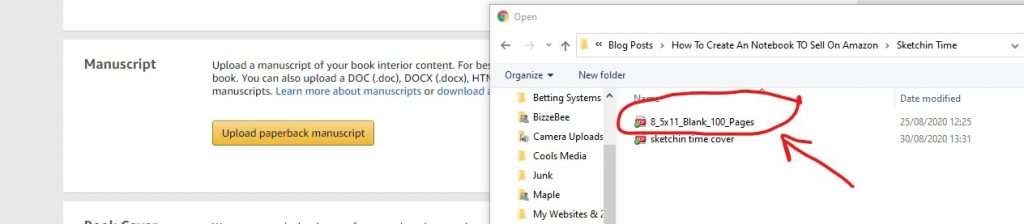
First of all you will need your pages.
So, I have made a 100-page book for sketchbooks and a lined page book great for notebooks.
Download them as a PDF file from below and save them to your computer. You will need these later.
DOWNLOAD FILE: 100 Page Sketch Book
DOWNLOAD FILE: 100 Page Lined Page Book
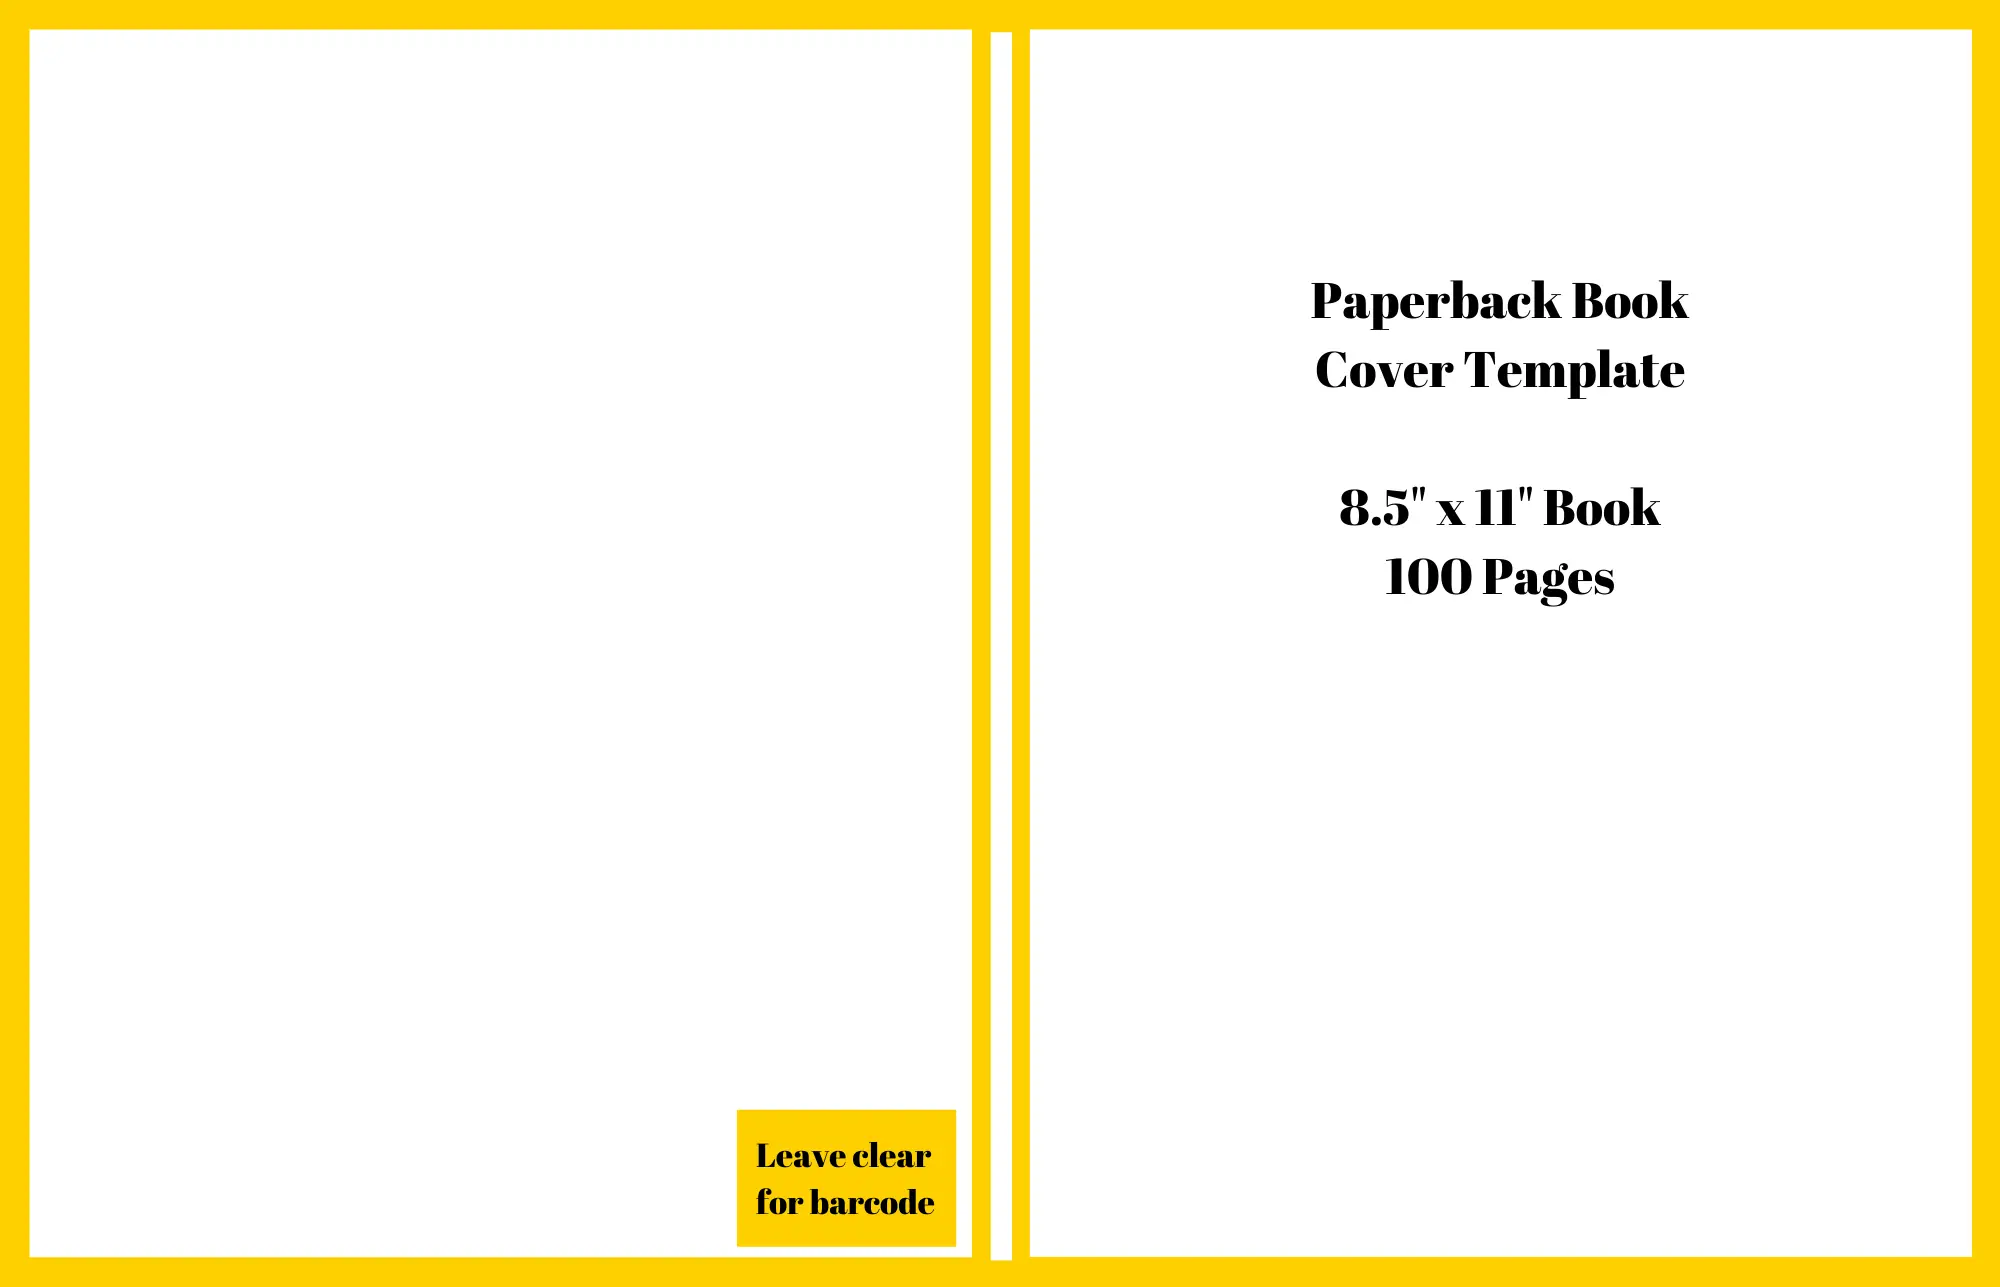
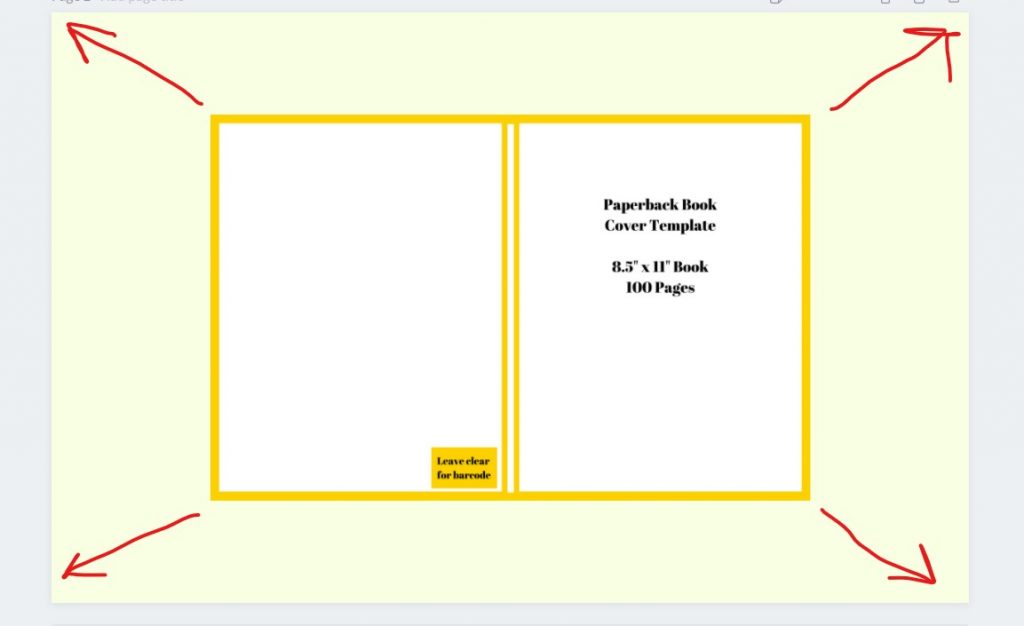
You will also need a template to use for your cover. This is vital as the dimensions of this have to be exact. This is an image file PNG format.
Grab this file and save it for later.
DOWNLOAD FILE: 8.5″ x 11″ Cover Template
The first thing we need to do is create our cover file.
I use the software Canva for this. I use the Pro account as you get thousands of pre-made templates and photos but they do have a good free account.
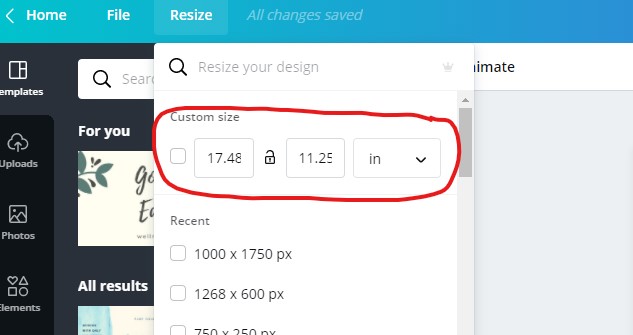
Follow the steps below of me designing a cover for this tutorial. What is important is that you have the size exactly 17.48″ x 11.25″ inches.
So, first of all open up Canva and create a new design with the dimensions above.
Upload the template I have provided. This will give you the guidelines you need to stay within for your cover.
The left side is the back and the right side will be the front of the book cover.
Stretch the template out so that it completely covers the canvas.
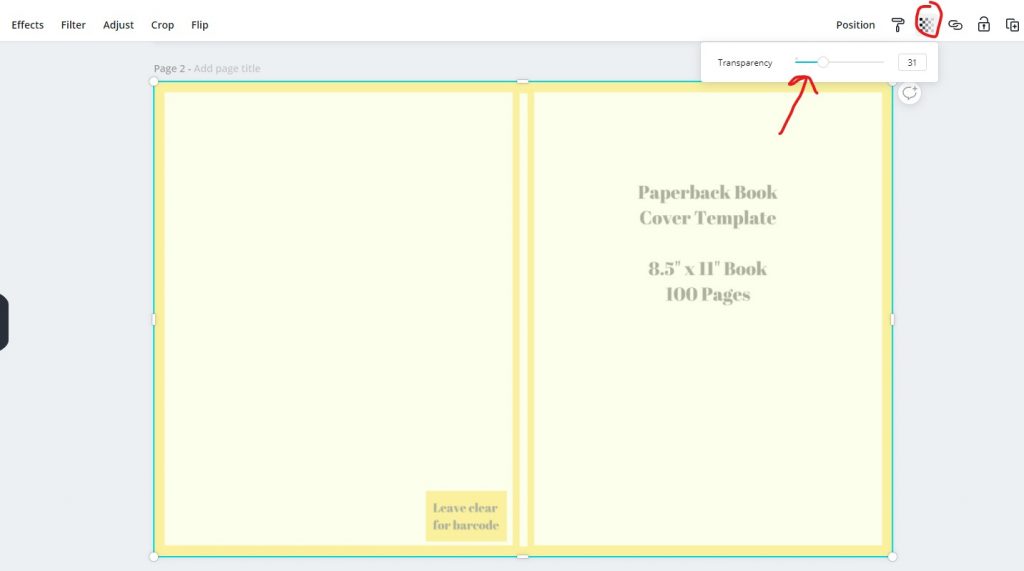
Then when you have the template at full canvas reduce the transparency so that you can see the background you are working on.
Remember, this template is only temporary. We will remove it when the cover is finished.
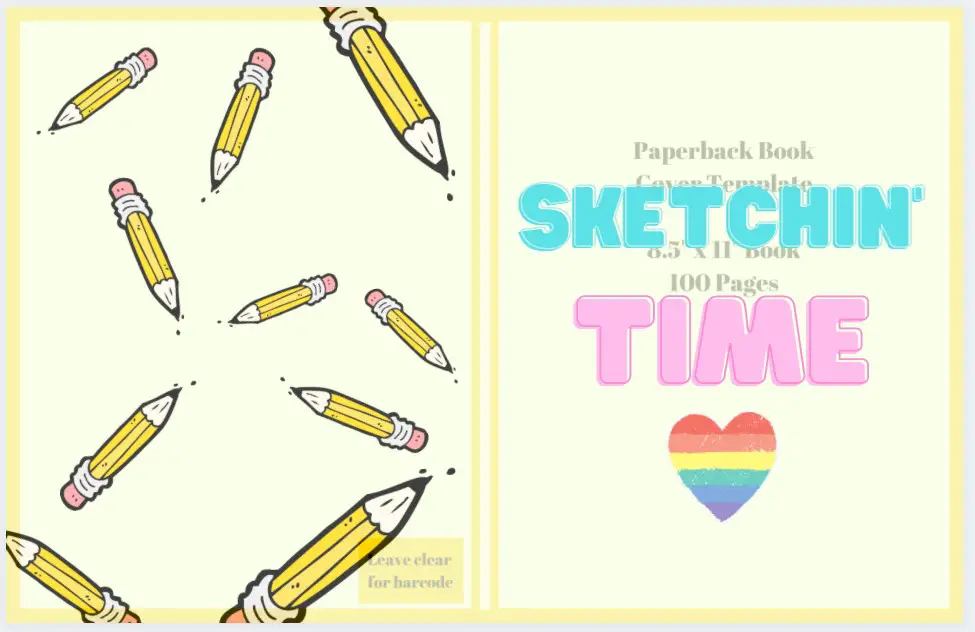
Ok great – now we can make our book cover.
So, get your creative hat on and make something cool and trendy!
Here I have made my cover.
You can still see the template in the background, which I can now remove. The template helps me center the text etc and split the sections into back and front (if I want to)
NOTE: I have the pro license for Canva which enables me to use the graphical elements for commercial uses. The free license does offer images but not as many and its best to always check the license on offer.
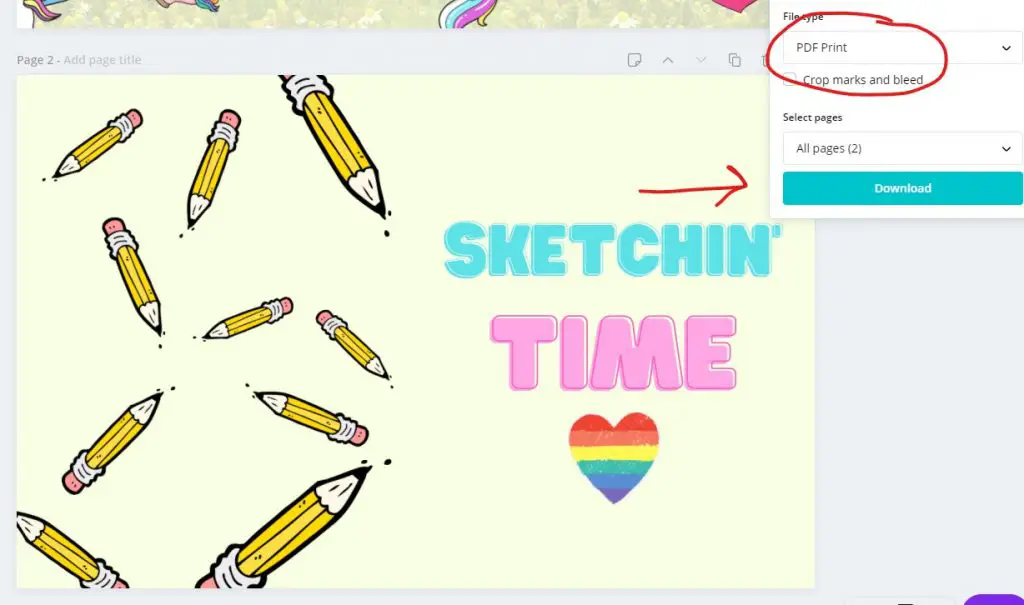
So, now I can simply remove the template and download the cover into my folder.
Make sure you download it as a PDF file.
Now we have the cover done its time to head over to Amazon KDP and upload our book and enter the details.
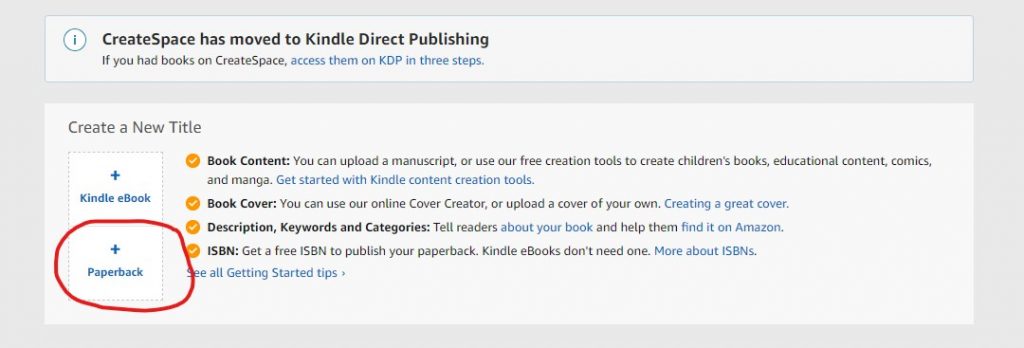
Sign into Amazon KDP (use your normal Amazon login details)
Select “add paperback”
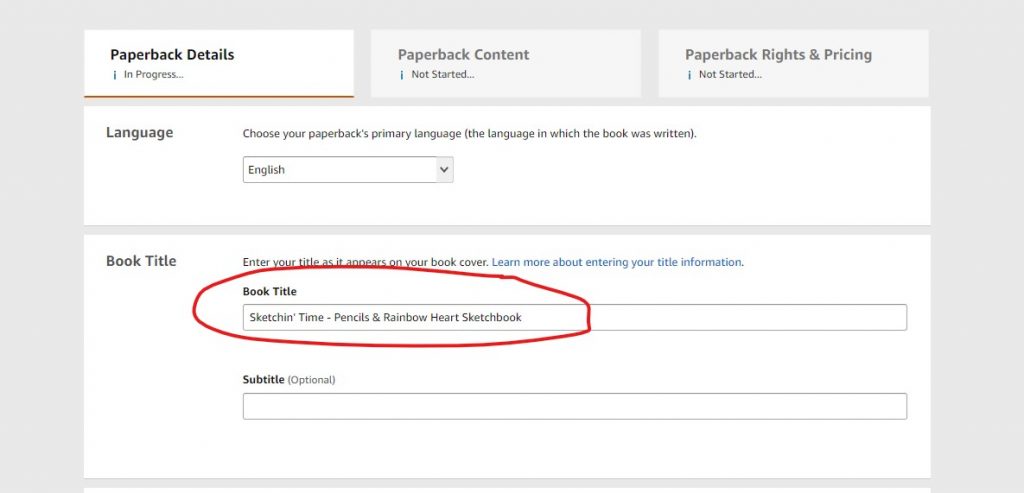
Now is when we will enter the book details.
Firstly enter the title. You also have the option here of a subtitle but this is optional.
The title of the book must appear here and physically on the book somewhere. In our case, the title is “Sketchin’ Time” and you can clearly see the first two words are in the title section. You can also put some other keywords here but do not overdo it.
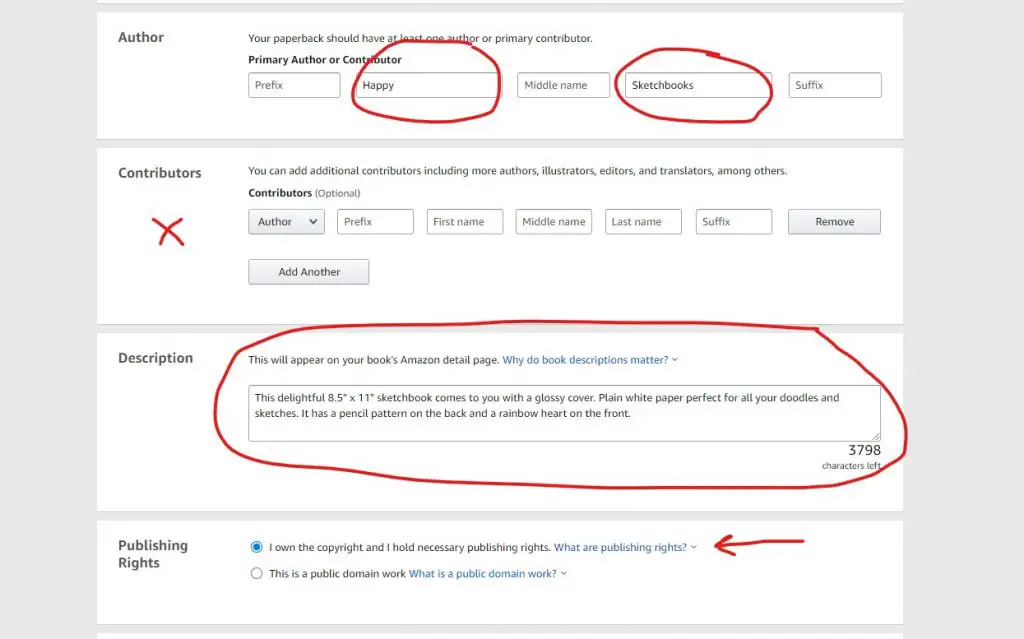
Next up fill in the author section, description and ensure you have ticked that you own the copyrights button.
You do not have to put your own name in the author section, you can use a pen name or even a range or company name. I have used the term “Happy Sketchbooks” for mine.
NOTE: Sometimes they ask you to change your author name. I am a little unclear as to why really. Just use something that doesn’t conflict with the actual book title and could confuse the buyer. I find a generic name here works best.
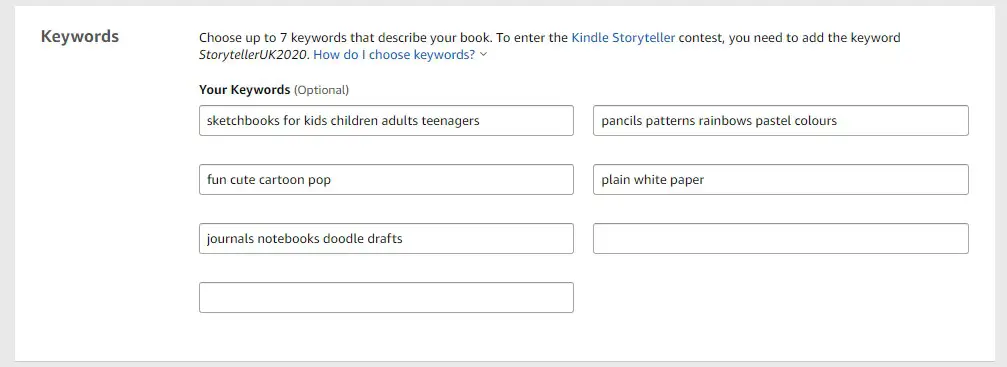
Next up we are going to add our keywords.
Disclaimer here: I am NOT an expert on this. Keywords are a bit of a grey area for me and as KDP gives you no data on keywords it is hard to tell what works and what doesn’t.
I tend to use descriptive words on what I think people would search for if they are looking for a particular book. I did read that these words can be discovered in ANY ORDER and not just as EXACT PHRASES.
It’s hit and miss for me.
If you have any thoughts or ideas on how to improve keywords with this then please get in touch or drop a comment below.
Anyway, full transparency. Here are the ones I used for this book.
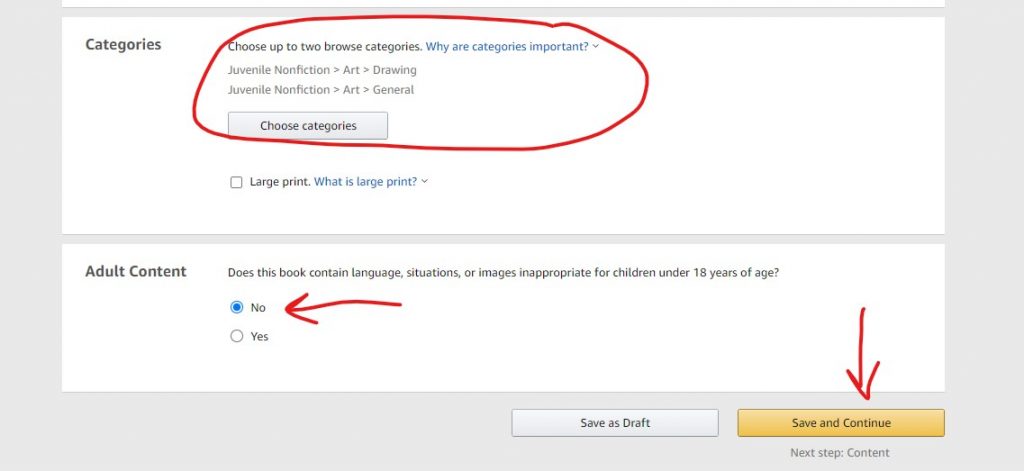
Next up you can submit it to two categories. Again, a bit of a grey area here as there are no specific ones for notebooks and sketchbooks so have a play around.
Then select the button saying “no adult conent” and click save and we move on to the next stage.
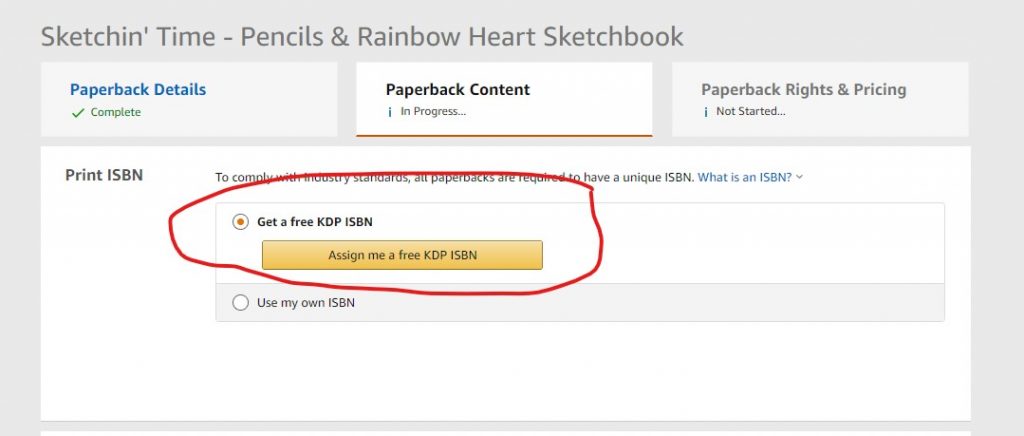
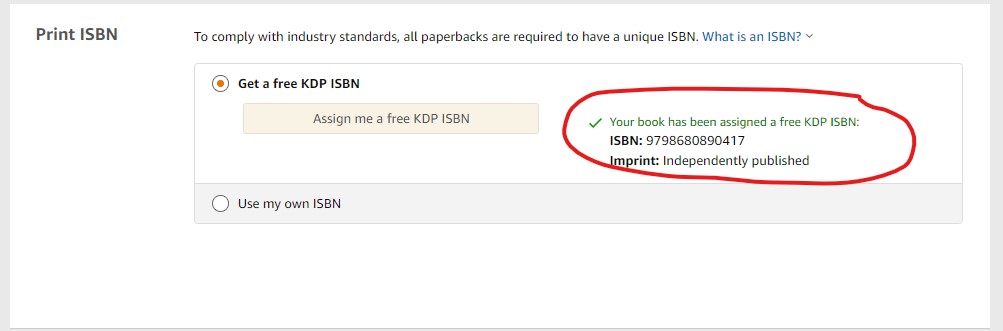
On the next page, you need to select the “Get Free KDP ISBN button” – this will generate a barcode number for your book.
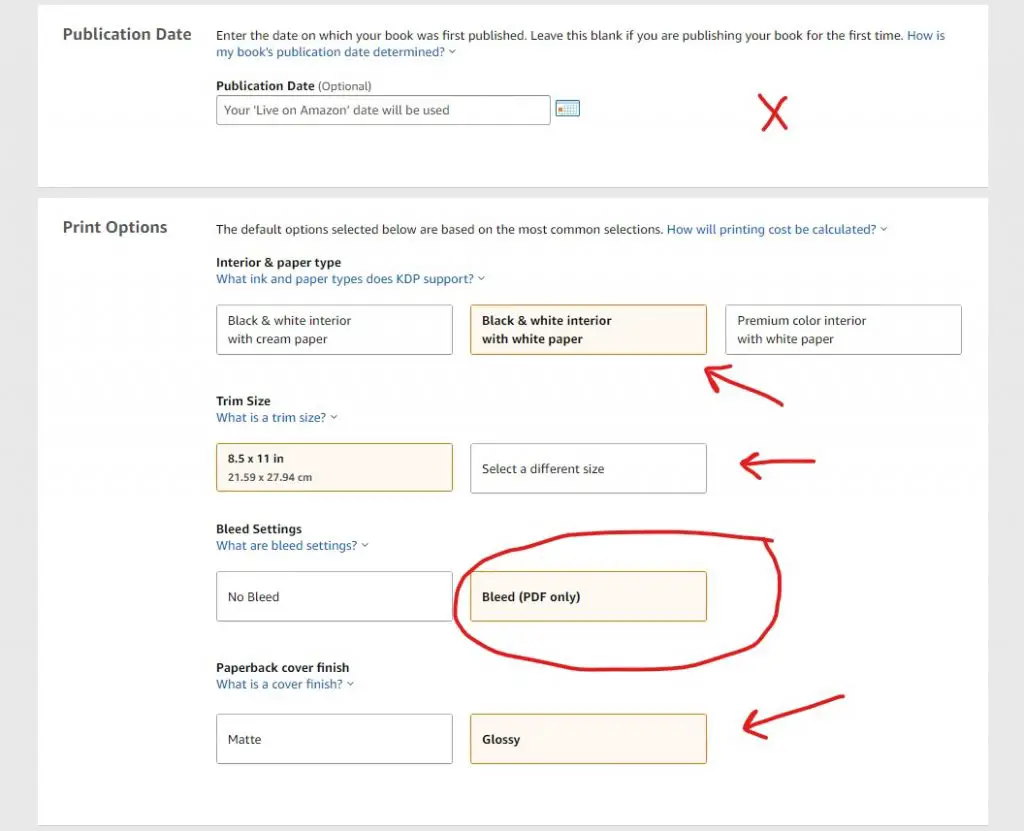
Next up you can select a publication date if you want to, I don’t but that is up to you.
We also need to enter the printing size requirements and options here.
I have selected “black & white interior paper”. You need to select 8.5″ x 11″ size and “bleed PDF only”.
Whether the cover is “matte” or “glossy” is up to you. Both look and feel great so it’s really your call.
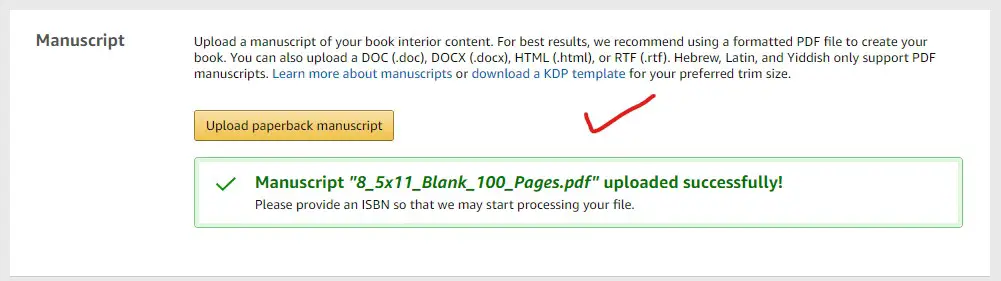
Next, we can upload our actual book pages (the manuscript). In this case, I will be simply uploading the 100 blank page sketchbook file. So, I have downloaded the file from above and now simply upload it via the “upload paperback manuscript” button.
A few moments later you will see that your manuscript has been uploaded.
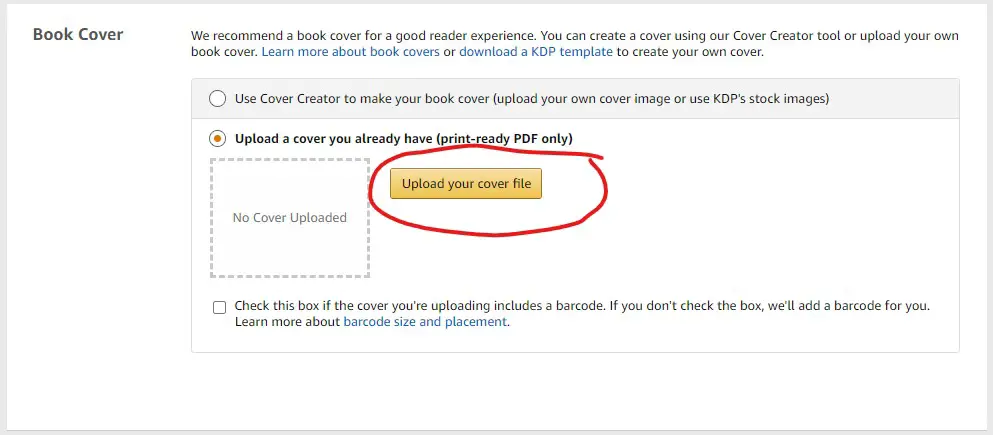
Now we need to upload our cover which we made eariler.
You can if you want to use Amazon’s own cover creator but I find it very limiting so I prefer to make my own. So, in order to upload our own, we need to select the button “upload a cover you already have”
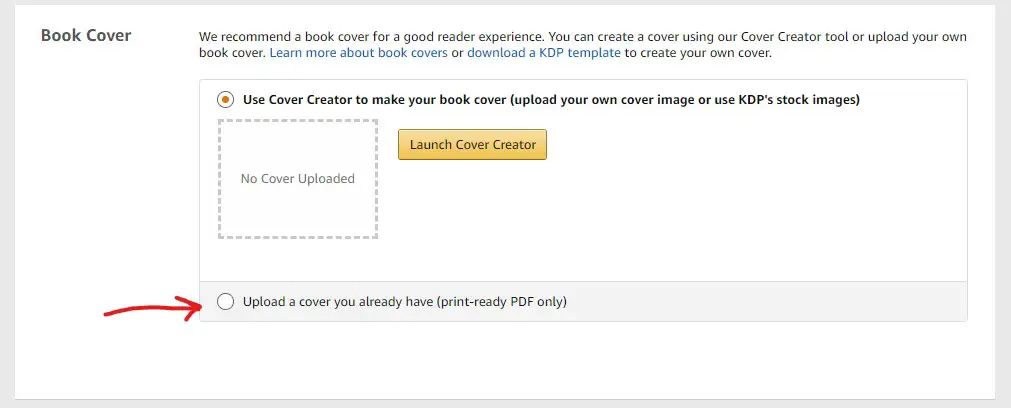
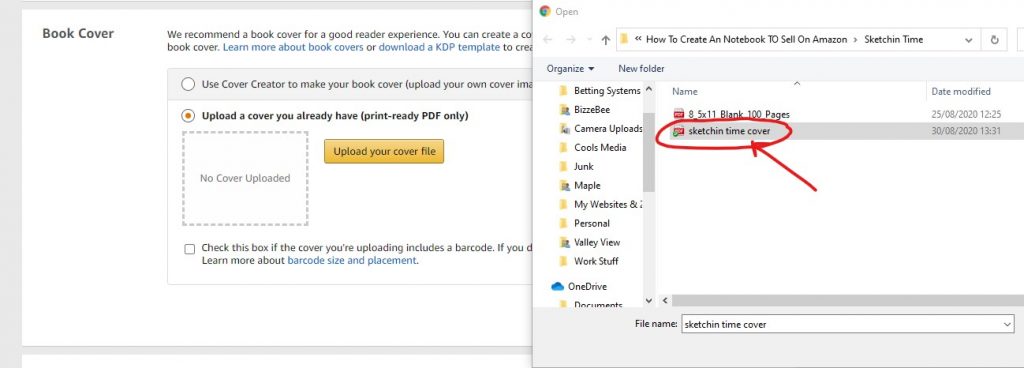
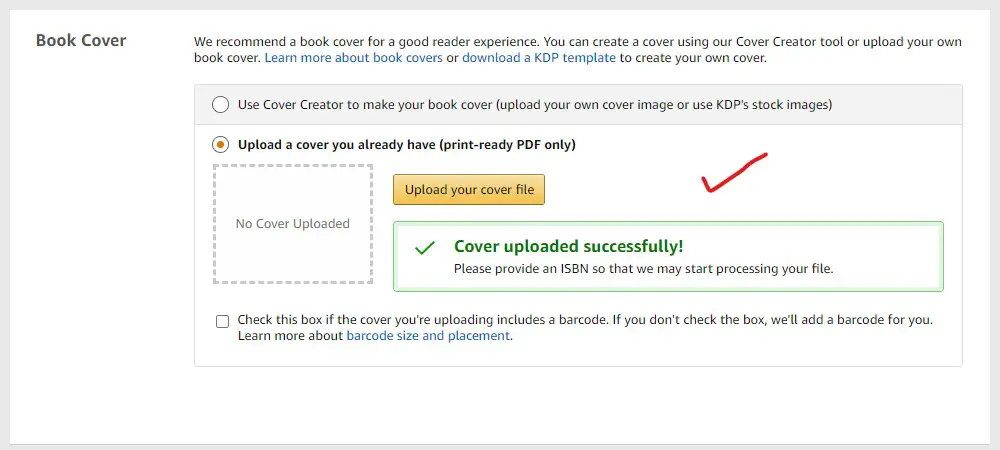
And just like the manuscript, you can upload your own cover by using the “upload your cover file” button.
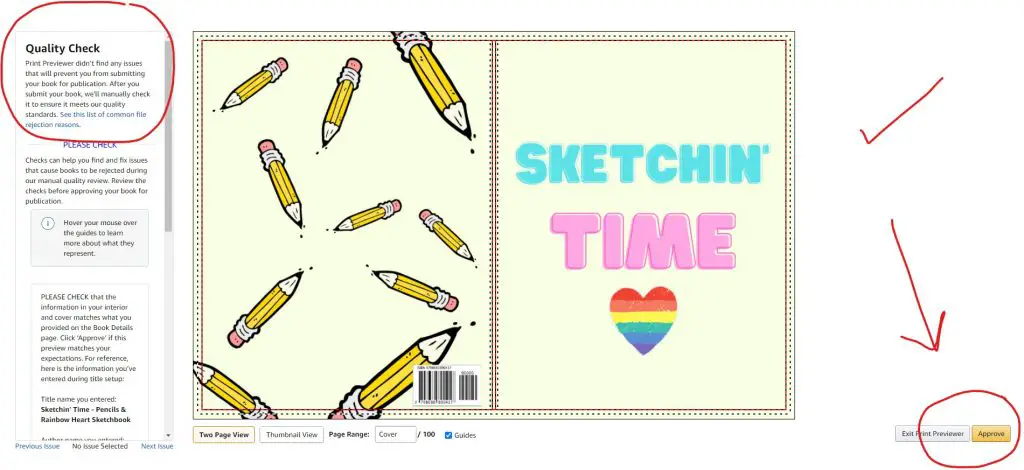
Now is where you can preview your book for the first time! Exciting hey!
Click on the “Launch previewer” button to see what your book will look like!
Note: This process can take a short while depending on your PC spec, internet speed, Amazon servers, etc so click it then go and water the plants or put the kettle on and come back in a few minutes.

Fingers crossed your book will be approved by the designer. (It will if you use the templates I have provided) and you are all set to set your pricing.
Have a scroll through to check out your book. Click “approve” to move on.
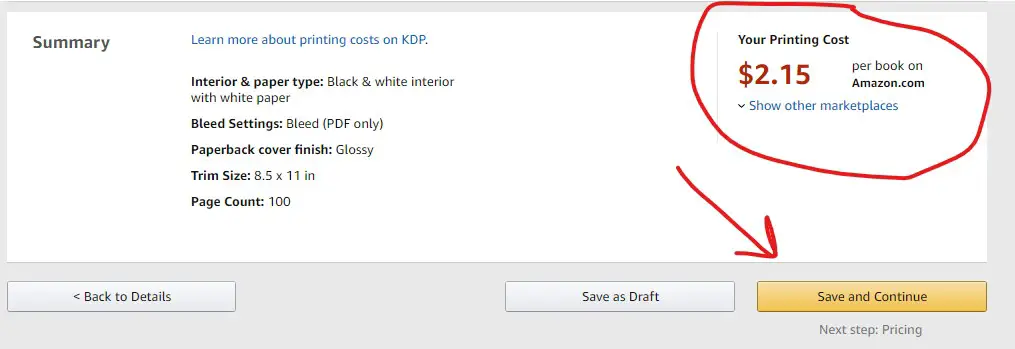
Now you will see how much it will cost to print your book every time someone orders it.
Remember, this is print on demand so you do not pay any costs upfront. This fee is deducted from any sales revenue you generate.
Click “save and continue” to move on to pricing.
On the pricing page, I advise selecting the “expanded distribution” box. Also, be sure to click the down arrow and price your book for each country to maximize your profits.
These are just basic books though so don’t go mad on pricing. I aim to just make a dollar or two per sale for me. So around $5 to $7 max for these. But up to you here.
Once you have done your pricing click on “Publish your paperback book”

Well done, you can do a little dance now as you have just published your own book! Yep, that’s right. You can wow your friends and family now!
We are not going to be publishing these as kindle books so just close this message.

You need to leave it about 72 hours for Amazon to review it before they publish it.
“Usually” this is a straightforward process with no glitches but occasionally they may want a subtle change here or there to the title or author names. It happens, unfortunately. Just read up on the terms & conditions and make sure you are all above board.
Now – do not think you are going to be a millionaire overnight but I hope this has given you some ideas and motivation if you want to publish your own notebooks, low content book, or even your own written work!
This is the exact process I used when I created my own Side Hustles book so there are no more excuses. Get yourself an Amazon KDP account and get some books published!
Here is a video of me uploading a journal that I made earlier.
Closing Thoughts
For me this is a great little side hustle, once you learn this process you can start to create books in no time at all.
Remember though that not all books will sell, in fact, sadly most will not sell any at all. This is a numbers game first and foremost. The top sellers almost certainly have thousands of books listed and they will make the most of their income from a select percentage. The 80/20 rule will most certainly be in effect here.
Play by the rules, this is Amazon’s playground remember so if they do not publish your book straight away and suggest some changes then do them.
Any thoughts or comments please leave them below!
If you want to take this to the next level and also get a head start with over 40 pre-made notebook templates then check out my in-depth video course here, especially for beginners.
Or, if that’s not for you right now then hop on the mailing list for future updates and more side hustles.
Update: Due to my error on the title being spelt wrong i will have to change this!!!
We are only human after all. But you get the idea haha
This is a very detailed article. Step by step explained and I like that. It’s very useful every beginner, thank you so much for sharing this.
Thanks for taking the time to comment – I do appreciate it. I hope the tutorial helps.
Hi John,
I just wanted to say thank you very much for this step by step guide. This is one of the very few articles I have read and have actually resulted in practical guidance and most importantly results!
God bless you.
Elle
You absolute legend! Thanks for stopping by dropping in a comment, but most of all thanks for actually doing it, taking action, and getting some results! I am super pleased for you, it’s made my evening reason this! Brilliant! 🙂
Thanks John for this detailed and clear, step by step plan and video! It really helps! 🙂
No worries Stella! Thank you for stopping by! I appreciate the comment, thank you.
Great article John! Thank you!
Quick question, What size template could we use for an A5 notebook?
Cheers
Not sure exactly – you could try a 6″ x 9″ – that is a popular size
Pingback:Side Income Man : Motivational Images For 2021
I love the idea of this, I need a new side hustle soon. Cheers for sharing Dude! Great idea!
No worries dude – enjoy it!
This is incredibly valuable. I have a long term goal to write a book and this is exactly what I need
Glad to help. You can apply these steps to pretty much any physical book.
🙌🏾 Thank you so much for this post! I saw a TikTok video introducing KDP to me but it made no sense how to implement it. I will be creating one this weekend! Thank you again for this detailed post.
Wow! You are amazing! I love it when I hear people taking positive action! Best of luck with your new side hustle. Please let me know how it goes!
This sounds a very nice side hustle. Been wanting to sell Pinterest template on etsy.
super useful and very detailed! I love this, would definitely enjoy making it for myself, it’s not as hard as thought it would
WOW! such great step-by-step info! I found this very helpful and inspirational ; )
thanks for the know-how!
Thanks for stopping by!
This is very informative, I am in planning mode for a book and this post will work as a reference guide for me in the future. Thank you for sharing details, step-by-step.
Thanks for your comment – yes, plan and execute!
Now, this is very helpful. I was planning on designing a travel notebook. Thank you for sharing this.
Thanks mate. If you need any help just let me know.
This is so very informative and very particular in details specialy in step by step process ..love it thanks for sharing this.
I like the details on this post. This would have been really helpful when I was first starting out@
Happy to help, thanks for stopping by
Thats a very helpful and informative post. Thanks for sharing
Such an practical guide and useful idea! Thanks a lot for sharing this with us and I am excited to get started soon!
No worries – thank you for stopping by
Great Blog, only issue resizing is a premium feature, might be useful to state that
How do you mean? For the different size books, I just upload different sizes?
Pingback:How To Make Money From Amazon | Side Income Man
Hey John! Thanks so much for this guide, I have already created 4 sketchbooks thanks to it! A couple of questions though: What did you use to create the sketch/lined pages? I am wanting to create some of my own but am unsure where to go for those. And additionally, how do I determine dimensions and all of that? Is there a guide out there that you’re aware of that explains all of that? Thanks again for this guide and thanks in advance for any additional information you may have to share!
That’s amazing! Well done. I create all my stuff using Canva. You can use other programs too, there are premium tools such as Tangent Templates which you may want to check out. I have used them before and they are very good. As for sizing in Canva just set your page dimensions to inches and set it to 6″ x 9″ or whatever size book you want to create and then get going! Hope this helps, feel free to ask any more questions.
Pingback:10 Ways To Make Money As A Digital Nomad - Crystal Clear Publications
How long does it take to start seeing a profit in this?
Depends on what you sell. You could in theory make sales from the first books you list.
Hi thanks for this fantastic guide!
The only issue I had is with the lined pages, Because they are all the same way around (ie not mirrored) I’m ending up with the margin on the wrong side for all the right hand pages, is there a workaround to this problem or do I just need to sit down and re-design them…?
Thanks again
Haha, I just had a look in some of my own notebooks and realised that it actually does look like this, just looked odd to me…!
Ah yes, the margins can be a bit tricky. I tend to do mine college-ruled so from edge to edge.
Pingback:How To Get Started With Amazon FBA And Send Your First Box In!
Why does the cover size have to be 17.48 x 11.25 if the notebook is letter size?
This is the front and back. A4 (approx) size notebooks.
Thank you so much for this article! I was able to follow your directions very easily and just published my first sketchbook. Yay!
You are amazing! Well done. Now rinse and repeat! Look for trends, educate yourself on keywords, what sells etc and make tons!
Wow – you definitely go step by step with this, which is so awesome of you. I am skeptical on whether this will generate money, but I could do something that would fall in line with my brand, and then that I guess serve two purposes. Hmm… I also wonder if I can create ebooks in the same way. Thank you for getting the wheels turning AND I’m totally bookmarking this…
It totally works – its all about the niche, keywords, audience etc though. You cant make a basic notepad and expect massive sales, of any but a targetted one that’s a different story. You could make epic stuff with your brand too. Thanks for stopping by.
So nice of you to share your learnings with the world. I never even thought about this business until now but it’s a great idea.
Amazing way to sell them! It’s first-time t know about this awesome way. Thank you for sharing!
Ive always wanted to sell books on amazon. Its so nice to learn from others experiences when it comes to business
This is so interesting and I definitely learned a lot. It is fascinating how you created these notebooks and it was helpful to see how you went through the selling process on Amazon.
This is so cool! I bet if you design a unique one, you can sell it fast at Amazon! This is very helpful indeed!
I am always looking for ways to make some extra money. Thank you for the detailed step-by-step guide!
You’re welcome, thanks for stopping by.
Such an amazingly simple and creative way to make extra income! I’m a stay-at-home mom and I am always looking for these kinds of ideas to earn some extra income for my family while at home with my baby. This looks simple and not too time-consuming.
This could be a great way for you to supplement your income. Best of luck with it!
Thanks for sharing step by step guide! It’s amazing and huge help to make money!
You’re welcome
Great tips. This would be a super simple way to help someone create an easy side hustle!
What would be the cover dimensions for a 6 by 9 notebook? I am confused as to how you determined the cover size for your sketchbook as it is slightly bigger than the blank pages.
Hi Jade, good point. It all depends on how many pages your book is going to be as that will determine the size of the spine. I found this video which could be useful: https://www.youtube.com/watch?v=AwwTw6PXwdg
Hi there, thank you so much for such a detailed step by step process. I am playing with the idea of KDP for journals, instead of actual physical ones to ship to amazon’s warehouses. This was such a helpful article. I would like to kindly ask, regarding pricing the KDP journal, are there any general pricing guidelines? As I don’t know how the material will be (cover, paper weight etc), how can we define a reasonable price? I wanted to buy some from other sellers, just to see what the quality of the material is, but I am not sure which ones are selling Print on Demand or if they are already printed and stored in their warehouse. Hope this makes sense 🙂 thank you in advance!
Hi, thanks for stopping by and dropping a comment. Regarding pricing, you can set it how you wish obviously. When you get to the publish page it will tell you how much your book will cost to print. You can then add on how much you want to make in terms of your profit. There are a few factors to consider though when creating your book. Black and white are cheaper than colour for example. And page count is also a factor, as well as size. I hope this helps, good luck with it all. Keep me posted on your progress!
Hi there. Everything seemed really easy to follow, however, I’m not sure how you remove the template once you had the front and back cover selected. Once I chose my designs, I wasn’t sure how to remove the template that I downloaded from your site. Can you please walk me through how to get rid of it?
Sure, first of all thanks for stopping by the blog. I relly appreciate that and you taking the time to comment. You have to think of you design as “layers” – so in order to remove the template once you have done your design you will need to “select” it first. It can be a little tricky I know, sometimes you may just have to “move” something out of the way first in order to select it. Once you have selected it just delete it. I hope this helps. Its not always easy explaining this sort of thing, feel free to DM me on Instagram and I will do better if you need more help. Have a great day.
This is amazing I’m about to be all over this! Question are you doing anything to get people to your listing or are you just posting as many as possible and letting them run? Will all of your listing be in one place, like your store?
Hi Shannon, love your enthusiasm for this! Go for it, I just tend to create them and let them run! You can assign author tags to your books and people can then filter by your name for example.
Hi!
I love this tutorial and have a question regarding the cover template – do the yellow borders show the bleed or should one keep the images within said borders?
Hi – no problem. glad you find it useful. The borders are not the cover bleed. You can fill that from memory.